
Hello everyone!
This is another article in the Making a Video Film With Your Smartphone series.
To make good phone-based videos, one must invest much dedication and thoughts. The more we put into our video, the more charming and intriguing our result will be.
Even if your phone cam is simpler than that of a DSLR, following this series will help you be able to create better video clips and have more artistic footage. Your results will be comparable to those shot with professional camcorders!
So, let’s go!
1. Have a Gimbal for your phone
This is to provide better stabilization for your phone cam.
Smartphones nowadays have superior stabilization ability. However, holding the phone on my hand only allows me with simple shots. Up, down, left, right, and that’s it.
If I shoot and walk at the same time, the video will get shaky. Even with Optical Image Stabilization, it still has that Jell-O like effects, when the images keeps bouncing.
Things are different with a Gimbal: it turns your phone into an action camera. Run or walk, twist or turn, the footage always comes out steady and smooth, like you are walking on air.
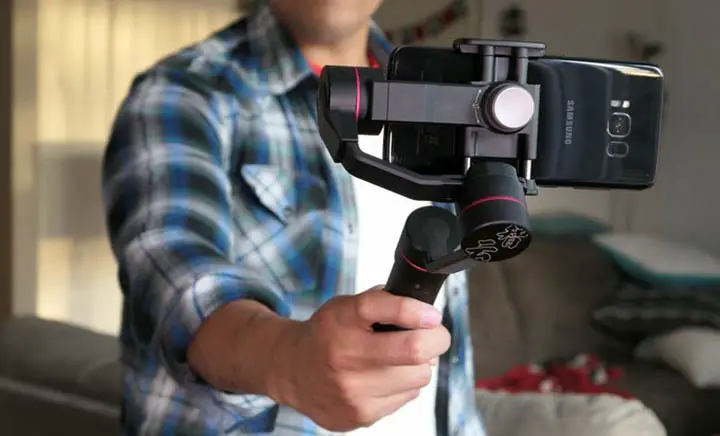
Trust me, get a gimbal, it will take your phone-based video and photography to a whole new level.
However, using a gimbal also leads to a situation when the white balance and exposure constantly change.
That leads to constant changes in the shooting setting, which will, in turn, ruin your shots.
So, along with the gimbal, you have to …
2. Use a video app
I said this before, and I will say it again. Get. A. Video. App.
Your native camera app won’t let you have full access to the manual control of the camera.
Auto mode on a phone cam gives you instant access, however, it puts you at a disadvantage when:
- The light is not high enough and the lens constantly goes in and out of focus.
- You want to move the focus from one object to another in a sequence.
- You want to apply special effects, like rack focus, on a sequence.
On the other hand, an authoritative 3rd part such as ProMovie (which I use myself) let you manually control all of the specs like brightness, white balance, contrast, etc.
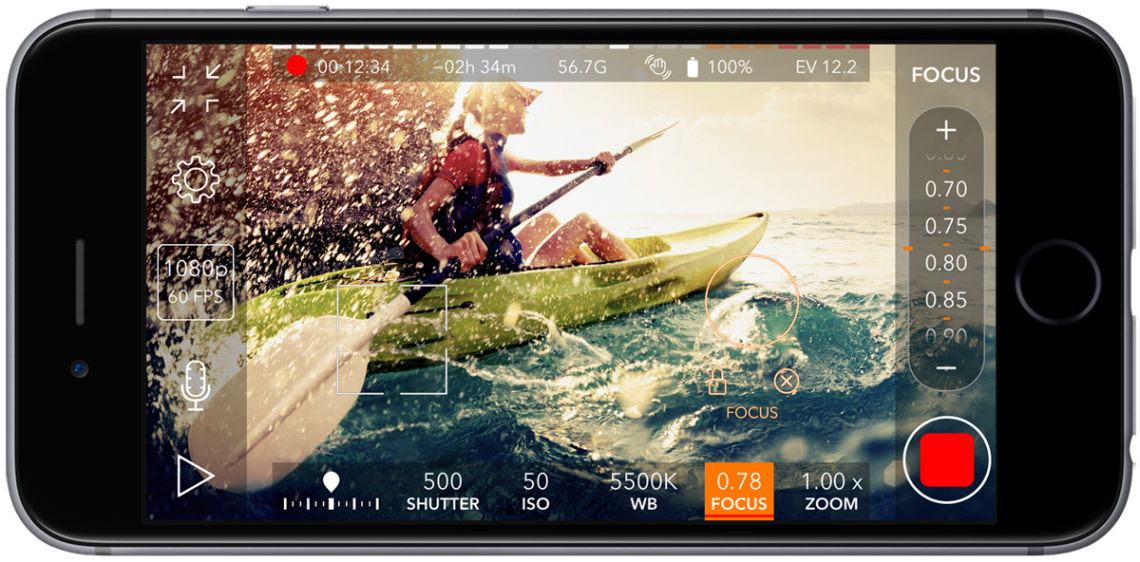
All the best thing in life might not be free, but ProMovie is. Its free version does put a watermark on your video, however, you only have to pay $2.99 to remove the watermark. Which is the same cost as your morning coffee. What a bargain, right?
Some common usages of ProMovie (and other video camera apps) are to:
- Set the white balance so that it doesn’t shift during the recording: tap the WB button, and choose the option that fits your lighting condition. You can alternatively switch between the many options to find the one that fits best.
Alternatively, you can uncheck the True Tone and manually set the white balance using the slider near the bottom.
- Lock exposure, by tapping on an item on the screen and hit lock. In case the image still looks too bright, we can continue to use the slider to fine tune it, which will change both the ISO and shutter speed accordingly.
- We can also manually set the ISO and shutter speed separately.
- In the resolution settings, we can set the video bit rate to 120MBps, which is much higher than the standard 25 Mbps. This increases the video dramatically by reducing compression, however, takes up a lot more storage space.
Beginners sometimes ask me about tricky situations when manually setting a shot, so I have listed some most common problems here:
- When light is too bright, change the ISO to the lowest, then adjust the exposure using the shutter speed to reduce noise.
- When light is too low, set the shutter speed no lower than the fps (frames per second) and change your exposure with the ISO setting.
- If you plan to shoot slow motion in 4K, set the shutter speed is at least twice your fps to reduce motion blur.
- To save storage space when shooting at 4K60, set the resolution to the max; when shotting at 4K30, set the resolution to around 50Mbps.
Buying a Gimbal and using an app are indeed important, but they are only about your device and accessories.
Another aspect that we can’t miss out is: what are the techniques to shoot a film professionally?
3. Including various shot types
This is a principle that I apply to all of my videos.
A shot is a language that you, as the videographer, uses to communicate with the viewers.
Below is a list of shots that I personally prefer in filming video. There are many other types of shots, but here are the things that I believe newcomers can learn easily:
- Panning shot: turn (or pan) the cam horizontally so it sweeps around the scene. You can pan from left to right, right to left. Good for panoramic views, or to show the distance between two subjects.
- Tilt shot: turn the cam up or down so it sweeps the scene in a vertical axis. Good for showing how high an object is, or to show the grandness and enormity of a scene.
- Close up shot: frames the subject tightly, so that it takes up most of the screen. Good for showing grandeur and scope, while making the viewer relate better to the scene.
- Wide shot (or long shot): shows the entire object and what’s around them. Good for showing the object in relation to the things/scene around.
- Medium shot: the intermediate between a close shot and a wide shot.
Shooting in various shots is especially useful when you make a video about a fixed scene, a fixed angle, or when there are not many frames left to show.
4. Story-telling
Lastly, make story-telling your priority in making a film video with your smartphone.
After all, what we try to communicate through a film clip is a message. The beautiful scenes and eye-catching shots are indeed important. However, as a matter of fact, mobile cinematography hasn’t caught up to that of professional camcorders.
That’s why we must utilize storytelling to our advantage here.
If you pay attention, on social media or video-sharing websites, the videos that tell an engaging story are more likely to be liked and commented, thus making it more popular. You can do this by either having a solid storyline. Or you can tell your story in a relatable way.
A structured storyline
It’s maybe a call with your ex, it might be how our mothers used to treat us, or it could be a youth – striving for his/her future. Just make your story something everyone can relate to.
To make a really great quality video, try having this narrative structure in your film clip:
- A good introduction
- A protagonist, with a goal
- Tension/conflict with that goal
- A climax/crisis point
- A resolution
This structure seems heavy, but it is the strongest way you can tell your story. It can make up for bad filming skills, even. With each part of this structure, 2 – 3 sequences are enough, and you can skip the narrative lines if need be.
A relatable experience
With that said, you can also tell your story concise, but full of emotion, like that of a short prose. The process here is simple:
1# Choose an emotion you want to convey.
For examples:
- The melancholy when you miss your ex, ask her out, but she refuses your offer.
- The bursting happiness when a project is completed and all your efforts paid off.
- The luxurious and abundant feeling when you finally get to live a rich life.
- etc.
2# Film the scenes that may relate to that feeling. Rainy sights from your window. The busy footsteps in a night. Bubbly sounds of expensive champagne. Sound effects work especially well here.
3# Make use of timelapse or slow motion. Slower speed often conveys warm, abundance and melancholy; while higher speed makes viewers feel more urgent, condensed and active.
With these two storytelling techniques, you have secured a place in the viewers’ heart. And that makes our phone video worth sharing.
So we have here my tutorial on How to get a great quality video from your smartphone. Make sure you don’t skip any post in this series to have interesting and intriguing film videos!
See you soon!