
To create a good soundtrack, you have to focus on the recording session. But recording in the studio will take you a lot of time and money.
So, you can make your room into a recording studio. The method to make a recording studio in the room that you cannot ignore is as follows:
- Choose a suitable area
- Renovate the room
- Set up the equipment
Today, let’s learn how to build a small budget recording studio in your home.
How to make a recording studio in your room
Building your home recording studio will take your time and effort. But you won’t regret making it. Below are what you have to do to make your room into a studio.
#1. Choose an area
The studio is where you will spend a lot of time. So, choose a place that is convenient, accessible, and as enjoyable as possible.
There are several things you should avoid when choosing a room for making the studio.
1. Small space
A large room will be better than a small room. The bigger space, the better the sound.
Besides, a larger space will allow you to accommodate more equipment and instruments. It is also more suitable for band recording.
2. Noise
The daily noise around you will be magnified 100 times through a microphone. So, try to choose the quietest room in your home. This will prevent the noise from ruining your recordings.
It is better to pick an interior room than an exterior room. It is quieter and also has better temperature and humidity.
3. Poor flooring
Hard floorings like concrete, tile, or hardwood floor are suitable for a home studio. Don’t choose a carpeted room, because foot traffic will make the carpet wear out quickly.
Besides, carpets absorb high frequencies while omitting low ones. This is bad for acoustics.
You can use an area rug instead of a carpet for your drum kit if necessary.
Moreover, a downstairs room will be better than an upstairs one. Its floor can prevent excessive foot noise.
4. Poor acoustics
Avoid selecting small rooms with low ceilings and parallel walls made by drywall. They have poor acoustics, so they are not suitable to be a recording studio.
Ideal rooms for recording are large. Besides, they need to have high ceilings, asymmetrical walls, and irregular surfaces.
It is difficult to find a room like this in your home. But you can choose the best one, then design it later.
#2. Renovate the room
1. Fill all the cracks
Sound leakage from your home studio can disturb the neighbors, it also affects your music quality. Thus, make sure that your studio is completely hermetic.
You should seal all the available cracks with sealing strips or putty. You can buy these materials in hardware stores or online.
2. Install some ventilation
After you fill all the cracks, your recording studio becomes a closed environment. So, you need to make it ventilated so that you have oxygen to breathe. Here is how to make an acoustic box for some ventilation in your studio.
- Use Medium-density fibreboard to make a box
- For airflow, put an S-shaped duct into the box
- Cover the rest of the box with acoustic foam
3. Clear and elevate the floor
First, you should remove as much furniture as possible from your studio. Then, elevate the floor. Elevating the floor will prevent any vibration from interfering with your recordings.
You can simply elevate the floor by lying wood across foam blocks. To prevent instability and wobbliness, secure the wood upon the foam blocks.
If your home is too old, the floor may not level. You will have to trim down some of the blocks.
4. Enhance the sound diffusion
When bouncing off the studio’s surfaces, the sounds may vary depending on the wall’s materials. That means that if you’d like your music to sound better, you should diffuse the sound.
To make the sound softer, you can add some objects in the studio like a sofa, beanbag, or pillows. These objects will reduce the “echo chamber” effect of the room.
You can also attach mineral wool insulations or audio foams to the walls and ceilings. There’re a lot of types and sizes of audio foams available online.
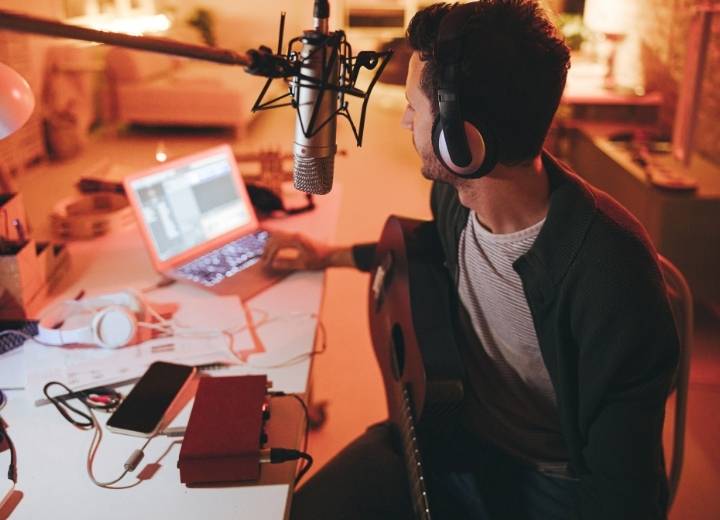
#3. Set up the equipment
You will need more than instruments in your home recording studio. A home recording studio also needs good equipment. Below is the essential equipment for your studio.
1. A good computer
The computer will do all the recording, editing, mixing, saving, and printing audio files. So, you should choose a new computer with decent specifications for music production.
With a good computer, you can rest assured to works for hours without any trouble.
2. Suitable recording software
You’ll need a Digital Audio Workstation (DAW) software for support in the recording. There are many options for you with various prices from free to expensive.
Some typical DAW software are ProTools, Ableton Live, and GarageBand.
ProTool is now the most accessible, learnable, user-friendly DAW software. Thus, it is not surprising that the price of this software is relatively high.
This software has pro-plug-ins for compassion, gain scheduling, reverb, and so on. So, it will help you to create high-quality mixes.
To use ProTool, you will have to pay $29.99 per month for the first 12 months. The cost is $34.99 per month on a month-to-month basis. If you buy a full-year package, the cost is $299 for the whole year.
Despite the high price, this software is worth the money. It is very useful in creating the highest quality recordings in any music genre.
Ableton is also a good DAW software for recording. It is less flexible than ProTool, but you can still have fine recordings with it. This software has a different interface and design. The price of Ableton Live 10 Standard is $359 for a one-time purchase.
If you have a MacBook, you might try GarageBand. It is the little sibling of ProTool and it is free on every MacBook.
The interface and function of this software are similar to ProTool. The difference here is that GarageBand doesn’t have as many bells and whistles as ProTool.
3. An audio interface
An audio interface also allows you to plug all the equipment into your computer. With a USB audio interface, you can connect your high-quality microphones to your DAW.
This device transfers electrical signals of other equipment into digital signals for the DAW. There are many good choices of audio interfaces on e-commercial websites.
4. A high-quality microphone
The microphone is very important for recording. You should equip your studio with a cardioid large-diaphragm condenser microphone.
This microphone is very suitable for a home studio because it rejects sound from the rear. A condenser microphone sounds great on vocals and acoustic instruments.
You can also use a cardioid dynamic microphone. This microphone is also good on vocal and guitar cabs.
5. A microphone stand and a pop filter
Of course, your microphone needs a stand. You should choose a durable stand for long-term use.
A pop filter is useful when you record vocals. It will prevent plosives from ruining your vocal recordings.
6. Headphones
You should have both closed-back and open-back headphones in your home recording studio. The headphones must be high-quality ones for the best sound quality.
The closed-back headphones are perfect for monitoring when recording. Sometimes, you can use these headphones for mixing in public places.
The open-back headphones are for mixing and mastering music. Don’t use earbuds or in-ear headphones in audio recording. They don’t give you accurate sounds.
7. Monitor speakers
Like headphones and the microphone, monitor speakers play an important role in your studio. Thus, it’s better to choose the good ones with higher prices.
Monitor speakers provide flat frequency response. So you will get the most neutral sound of the mix.
You can use closed-back headphones for recording, mixing, and mastering. But wearing these headphones for a long time will put your ears under a pressure. So, monitor speakers are very useful in sharing these works.
You can consult the list of best monitor speakers for home recording in this video
Benefits of making a home recording studio
1. Save money
Renting a studio for recording will cost you about $100 per hour. Some studios offer lower rates but remember that you get what you pay for.
Maybe you are lucky to find a high-quality studio at an affordable price. But you will still have the pressure of time because it takes many hours to perfect a track.
So, you will tend to rush through your recording session. This is not good for your budding music career. Therefore, you should make a mini recording studio in your room.
2. No limited working time
Your music studio will not limit you by a daily working schedule like others’ studios. You can record every time you want, 24 hours a day, 7 days a week.
Come up with a new song at 3 am and want to record it right away? No problem, because there is a studio right in your home.
3. Freely design and decorate your studio
The working environment has a great influence on work performance. The studio is more than your workspace. It is where you follow your passion and make your music dream come true.
So, if you have your home studio, you are free to arrange and decorate it as you like. From there, you will get more inspiration and be more creative.
3. Record as long as you like
When you have a home studio, you don’t have to pay for hourly renting costs. Therefore, you can record as long as you want.
You can try again and again until you satisfy with the results. No one will bother or get tired or impatient with you.
4. Private space
If you are a shy person, a home studio is a great idea. It will be your private space for recording. There will be no stress or embarrassment like when you go to a professional studio.
Your recording session will take place smoothly and efficiently. Practicing in your home studio can make you more confident to perform in other places.
5. Convenience and flexibility
Having a studio in your home, you will not need to worry about external influences. Bad weather, a broken car, or getting up late can’t delay your work.
A home studio always wins in terms of convenience and flexibility.
Final Thoughts
Turning your room into a home studio is not a simple job. However, with your patience, you can do some researches and make yourself a recording studio.
You may have some trial-and-error, but you will be successful after all. We hope that the article is extremely useful for building your desired home studio.