
In addition to questions about setting up a home karaoke system for personal needs, people are increasingly interested in how karaoke equipment is set up. The question of how to adjust the mixer for Karaoke receives a lot of attention from everyone.
The following article will guide with the next steps:
- Prepare the mixer
- Adjust Volume And Gains
- Adjust sound quality
- Adjust and test speakers.
- Adjust the effect
Let’s go into the detailed steps!
What Is A Mixer For Karaoke?
Like microphones, speakers, and monitors, a mixer is a relatively necessary device if you want to invest carefully in your home karaoke system.
Mixers are also known as amplifiers. It seems that these two names are not very related to each other, so many people are confused about their characters. Knowing another name for the mixer can sometimes help you avoid a lot of trouble when choosing to buy and when setting up.
The basic application of this device is to combine sounds from many sources during karaoke together.
The audio connection is really important because no matter what, you still need at least 2 sound sources: in and out during the use of the karaoke system. In addition, many complex systems also involve instrumental accompaniment.
You can consider a karaoke mixer like a professional DJ system. Seeing them as a DJ system is completely grounded because the mixer helps to connect the sound and helps to change the dynamics of the recording sources associated with the mixer.
Why Do You Need A Mixer For Karaoke?
Whether you need a mixer or not completely depends on the purpose of your karaoke. However, a Mixer is a necessary device for karaoke systems if your design becomes more professional.
Mixers make a huge difference to the sound of karaoke. Specifically, this means that the mixer will include many different necessary functions in one movement.
The integration will help the mixer to adjust the volume with bass or treble, the tone, and at the same time, the dynamics of the sound.
Therefore, equipping a mixer for the karaoke system will help improve the quality of the results when singing, and at the same time, help the sound conveyed in fun become better.
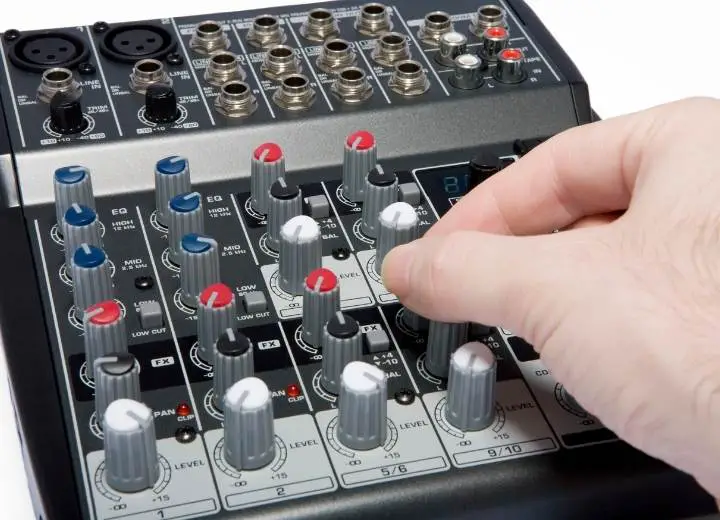
How To Adjust Mixer For Karaoke
Many people think that adjusting the mixer for karaoke is difficult and they need to spend a lot of time and effort to accomplish this. However, this statement is not correct. For more clarification on this issue, you can watch the video.
To better understand this issue, let’s take a closer look at the following specific steps:
Prepare the mixer
It won’t be too difficult if you just prepare a simple mixer.
However, if you have a fairly complex mixer and karaoke system model, this job will sometimes be difficult for someone who has never set it up.
Don’t worry. You can try the following steps to set up a mixer for karaoke for the first time:
- As a first step, plug the prepared microphones into the mixer’s XLR jack if your microphone is wired. If your microphone is dynamic, you’ll need another way. Although you don’t have to enable PHANTOM mode in your dynamic microphone, you should do it if you own a condenser microphone.
- Next, plug the instruments, if available, into the mixer’s 6mm jack.
- Once you’ve plugged in the jack, you can proceed to connect the preset send effects at the mixer to this effect’s input. At the same time, the output part of the effect is connected in reverse to the mixer.
- Next, connect the AUX.
- After the connection is complete, you adjust the gain to its lowest level (the minimum is on the right). Also, drag the negative slider to the bottom of each bar.
- After that, set the tuner of 3 tones: low, mid, high to position 0.
- Finally, you proceed to adjust the pan part of the center channel.
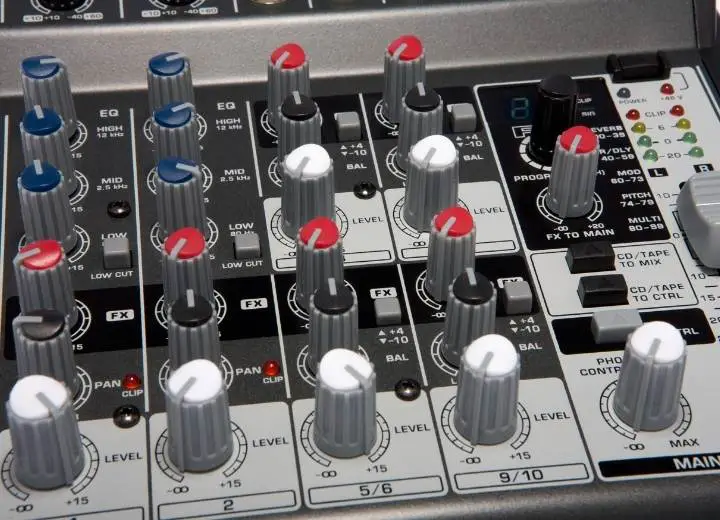
Adjust Volume And Gains
After preparing the mixer, you will proceed to adjust the Volume And Gains.
- First, look to see if the mixer has a PFL button; if so, press it down. After pressing the button, you can check the sound in the machine at 2 levels: medium and maximum. After the test level, you can increase the gain until the machine’s 2 LR bars are only oDB.
- Once you’ve adjusted the mixer’s gain levels, you shouldn’t touch them. You should only connect unless the band section changes its volume level.
- You should remember the change of the dB rule and only change the volume part of the mixer.
This can be called a step to adjust the LR to the odB level, and at the same time change the subgroup to -3dB.
Adjust sound quality
When performing this step, a small note is that you should only turn on a certain type of sound to feel the difference during the adjustment process. If you find errors in the volume during listening, stop and fix them until it’s okay.
Some common words in the process of adjusting the volume such as:
- LO (LOW): is a fixed level at 80-100 Hz. The increase and decrease in sound help them become warmer and more powerful during use. However, do not abuse it because the sound may be buzzing, not clear.
- MID: is a fixed level at 800 HZ, 1 kHz, 2kHz. Changing the sound makes the sound clearer and sharper. However, do not use it because it can cause stuffiness and swelling.
- HI: fixed level is 8 kHz and 12 kHz. You can fully adjust the range of the HI to distinguish its many timbres. However, do not push up too high as this can make a howl.
Adjust and test speakers
After you feel that the sound quality is stable, you may need to check the next device, which is the speaker.
- During use, you can raise the AUX button until you feel satisfied with the speaker quality.
- One thing to keep in mind is only to use AUX Pre because it helps the sound quality not be affected.
- Finally, once you have reached a stable level, you can leave it to use without further editing unless required to do so.
Adjust the effect
Besides, another very important thing that affects the process of additional instruments is the effect. For this problem, you can handle it this way:
- Use the lowest Send effect and Return result also at 0DB
- Change the channel effect used until you feel good and use it.
After you have adjusted the karaoke mixer, to be more sure, you can start the entire karaoke system and test it to see the results. If you feel your karaoke system and mixer work well together, you’ve done it right.
On the contrary, if you are not satisfied with the way you have adjusted the mixer just now, you can do it again until you are satisfied.
Frequently Asked Questions
When learning about how to adjust a mixer for karaoke, many people also wonder about related information. Here’s a look at some of the most frequently asked questions around:
What does gain do on a mixer?
Gain is a volume control for each channel of the mixer. This is a device that many people know by another name, Trim.
You can use gain to control the volume levels before they enter the channel. Today there are many input devices connected to mixers. Simply put, the gain’s job is to control how the faders in the mixer control the sound.
What is the best karaoke amplifier mixer?
Are you really wondering what type of amplifier to choose the best mixer for your karaoke system?
Here are some options to consider: Pyle PTA66BT, EMB Pro 700-watt Digital Karaoke Mixer, Hisonic Dual Channel MA-3800K, Roland Martin MA-3000KII 750W Karaoke System, IDOLpro 1300W Professional Karaoke System
How do I connect my karaoke mixer to my laptop?
Nowadays, you can completely connect a karaoke mixer to your laptop easily.
You just need to go to the laptop’s settings, then adjust so that they can link to karaoke using Bluetooth. Adjust the same with karaoke. Finally, you can finish and start your karaoke activity.
Does the mixer affect sound quality?
You can be assured of the quality of your sound quality improvement service. At the same time, it can also have a positive effect on your voice. A mixer that can help improve is based on frequency controls such as mid and bass.
Therefore, using a mixer can completely help you control and balance the sound in the most optimal way. You can use a mixer to make your karaoke session even better.
Conclusion
Above is some information about how to adjust karaoke mixers and some related issues that may interest you. Hopefully, after reading this article, you will have more knowledge about the problem so that you can adjust and set up the mixer the way you want to create good karaoke tracks.
Thank you for reading!